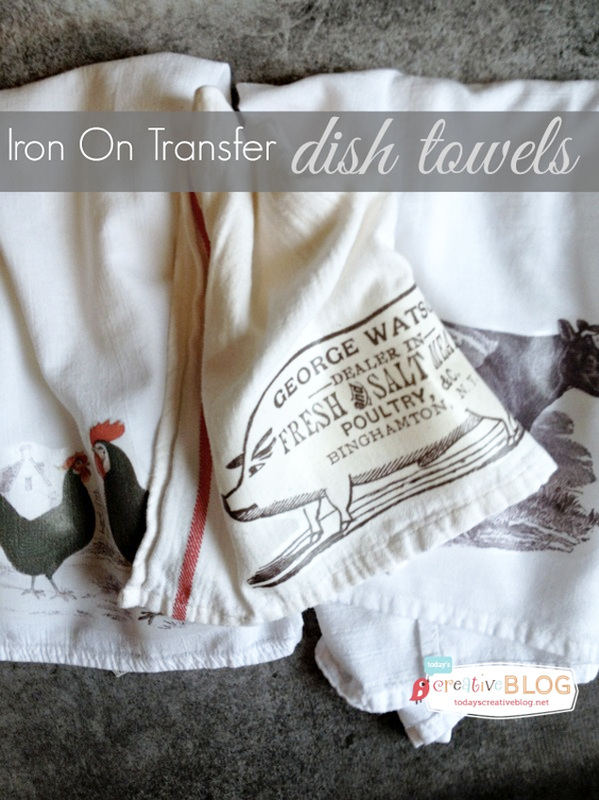
Iron On Transfer Paper – I use either Jolee’s or Avery. I like them both. I find them at Michael’s and make sure to get ones for light fabric.
Cloth Napkins – You want cotton. You can use a poly blend, but you’ll need to be very careful not to scorch them while ironing.
Iron and ironing board.
Images – I find all my images on The Graphics Fairy. They are free. I “save as” and then open up a word doc to insert the image. This way I can control their size and get several on one sheet.
1. After choosing my image, I load my printer with the lined side of my transfer paper facing up.
You want it to print on the non lined side, so depending on your printer and how it’s set up, will depend on how you load the paper.
2. Trim image and place image face down on your fabric where you want the design to be. Press your HOT iron (no steam) over the image, ironing it for about 20 seconds.
I know it’s tempting to lift it up right away, but wait til it’s cool.
3. After it’s cooled (it only takes about 1 minute or so to cool) gently peel up on corner, making sure it’s adhering to the fabric. If it all looks great, continue peeling. This is your Martha moment! You’ll feel like doing a cartwheel!
And now you’ve got yourself a darling napkin!
I wash all my iron on transfer items with no issues, but do read the package instructions for more details.
www.onegoodthingbyjillee.com
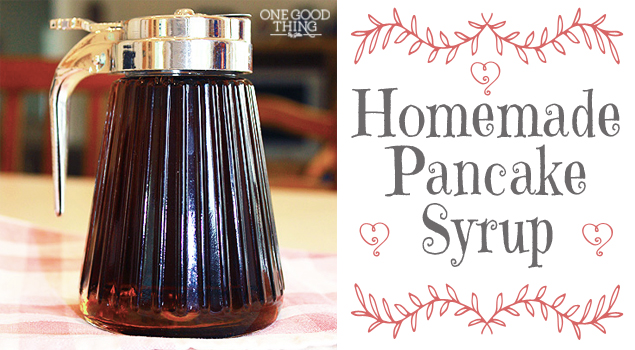
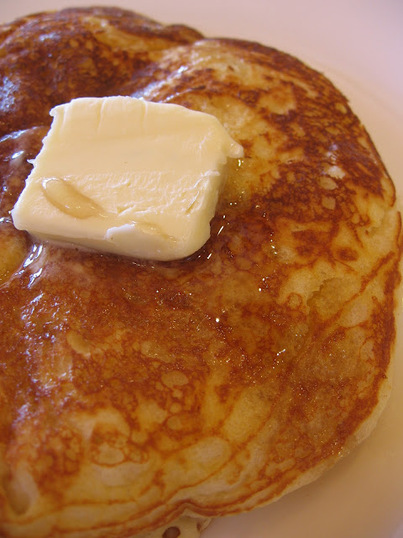
HOMEMADE PANCAKE SYRUP
Ingredients:
1 cup water
1 cup regular sugar
1 cup brown sugar
1/2 tsp Mapeleine (imitation maple flavoring)
Directions:
Bring the water to a boil in a small saucepan on the stove add both types of sugar and the Mapeleine and stir until all the sugar is completely dissolved. Take off the heat.
At this point I like to let mine cool. I was impatient (no way!) so I put the saucepan on the kitchen window sill to speed up the process.
After it cools down I think it’s the PERFECT consistency! That’s when I pour it into a syrup dispenser like this one.
www.onegoodthingbyjillee.com
Homemade Ice Cream Cake Crunchies
Ingredients:
2/3 standard package of Oreo cookies (or 2 1/2 cups Oreo cookie crumbs)
1 7.25-ounce bottle Magic Shell ice cream topping (or almost 1 cup of homemade Magic Shell, recipe below)
Instructions:
Crush the Oreos so you get 2 1/2 cups Oreo crumbs. Pour the Magic Shell topping over the cookie crumbs and mix well to combine. Use as an ice cream topping or the filling for ice cream cakes or pies.
http://www.ourbestbites.com/2012/06/how-to-homemade-carvel-crunchies-homemade-magic-shell-topping/

Homemade Magic Shell
Ingredients:
8 ounces high-quality chocolate
2 tablespoons coconut oil
Instructions:
Combine chocolate and coconut oil in a microwave-safe bowl. Heat in the microwave in 20 second increments, stirring every 20 seconds, until smooth. Drizzle over ice cream, dip frozen/cold treats in the chocolate, or use in the Homemade Ice Cream Cake Crunchy recipe.
http://www.ourbestbites.com/2012/06/how-to-homemade-carvel-crunchies-homemade-magic-shell-topping/
Homemade Coffee Creamer Base Recipe
1 14 oz. can sweetened condensed milk (I used the fat-free variety)*
1 1/2 cups milk (you can also use soy or rice milk if you need to avoid excessive lactose)
Mix the two ingredients together very well, either by whisking or by shaking in a tightly-lidded container. This mixture will keep in the refrigerator for up to two weeks.
But I wanted something a little more exciting than just a sweetened coffee and the cinnamon vanilla combo sounded delicious. So here’s the recipe for that (so easy!):
Cinnamon Vanilla Coffee Creamer
to the base recipe, add
1 Tablespoon of Vanilla
1/2 teaspoon cinnamon
www.mealplanningmagic.com/homemade-vanilla-cinnamon-creamer

Apple Pie
2 TBS ground cinnamon
1 TBS ground nutmeg
1/2 TBS ground allspice
1/2 TBS ground cloves
Pumpkin Pie
1 teaspoon cinnamon
1/8 teaspoon nutmeg
1/8 teaspoon allspice
1/4 teaspoon ginger
Italian Seasoning
1/4 teaspoon oregano
1/4 teaspoon marjoram
1/4 teaspoon basil
1/8 teaspoon sage
Poultry Seasoning
2 TBS sage
1 TBS thyme
1 TBS marjoram
1 TBS savory
1/2 tsp ground black pepper
Pinch of cloves
Pickling
2 TBS allspice berries
2 TBS cardamom seeds
2 TBS coriander seeds
2 TBS whole cloves
2 TBS mustard seeds
2 TBS peppercorns
Add:
2 bay leaves (crumbled)
2 cinnamon sticks (broken)
2 small pieces dried gingerroot (chopped)
2 small dried red chilies (crushed) or 1-2 tsp hot pepper flakes.
Bulk Bouquet Garni
Using dried herbs:
2 TBS parsley
2 TBS celery leaves
1 TBS thyme
1 TBS marjoram
Mix together then divide evenly onto 12 cheesecloth squares (approx 4? square, 1/2 TBS herb mix per square); add a couple peppercorns and one bay leaf (dried) into each sachet; tie the sachets closed. Store in an airtight container and use as needed.
Three Tasty Recipes To Shake The Salt Habit
Here are three recipes you can use to flavor dishes, nice alternative to salt if you’re trying to cut or reduce salt from your diet.
Salt Free Seasoning Shake #1
1 TBS garlic powder
1 tsp basil
1 tsp thyme
1 tsp parsley
1 tsp savory
1 tsp mace
1 tsp onion powder
1 tsp black pepper
1 tsp sage
1/2 tsp cayenne pepper
Salt Free Seasoning Shake #2
2 tsp garlic powder
1 tsp basil
1 tsp oregano
1 tsp lemon peel powder
Directions For Both: Simply mix together the ingredients from either recipe then put in a herb shaker for easy use.
No Salt Seasoning Shake #3
1 tsp garlic powder
1/2 tsp onion powder
1/2 tsp mustard (dry)
1/2 tsp thyme (dried)
1/2 tsp paprika
1/2 tsp black pepper
1/2 tsp white pepper
1/4 tsp celery seed
Directions:
Mix all ingredients together and store in an airtight container. You can keep a portion of this in a shaker and just shake over your dish as you would salt.
Try this on soups and meats too when cooking, works well for seasoning chicken.
Salad Seasoning Shake
Mix together and keep in a single shaker to season up your salads:
1/4 cup Parsley flakes
2 TBS Oregano
2 TBS Basil
2 TBS Marjoram
1 TBS Dry mustard
1 1/2 tsp Pepper
Makes approximately 3/4 cup. Use a shaker that has larger holes and preferably a cap to seal flavor. Store in a cool, dry spot.
Cajun Kicker Seasoning
Use on fish, shrimp, chicken and whatever else you like!
4 TBS Paprika
3 TBS Basil (dried)
2 TBS Thyme (dried)
2 TBS Onion Flakes (minced)
2 TBS Garlic Powder
1 TBS Fennel Seeds (crushed)
1 TBS Parsley Flakes
1 TBS Salt
1 1/2 tsp Cayenne Pepper
1 tsp Pepper
Directions:
Mix all ingredients and store in an airtight container or jar with tight fitting lid.
Cinnamon Sugar
1/2 cup sugar
1 tablespoon cinnamon
www.tipnut.com/spices-tip
Rice Seasoning Mix
Ingredients:
3/4 cup chicken bouillon granule
1/2 cup dried parsley
1 tablespoon basil
1 tablespoon dill weed
2 tablespoons dried onion flakes
1 teaspoon seasoning salt
2 teaspoons garlic powder
1 teaspoon lemon pepper seasoning
1 cup almonds, coarsley chopped,optional
Directions:
Mix all together well.
Store in airtight container (I use a pint canning jar).
When ready to make rice, combine 1 cup rice, 2 cups water, and 3 T seasoning.
Bring water to a boil.
Add rice and seasoning.
Reduce to simmer, cover, and cook for 18 minutes.
http://www.food.com/recipe/rice-seasoning-mix-26251?oc=linkback
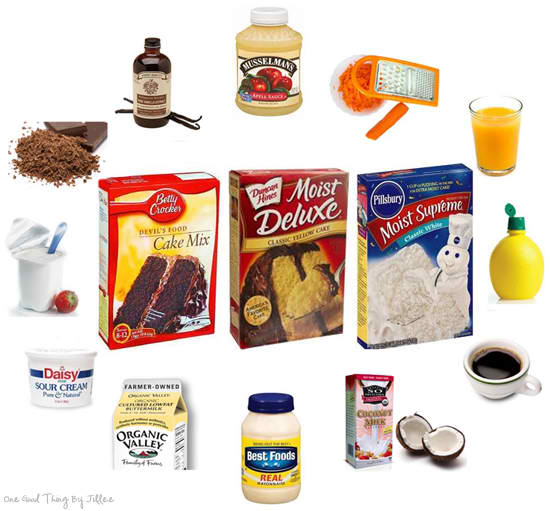
“Doctored Up” Cake Mix Ideas
A fail-safe method to make all cake mixes better is to substitute buttermilk for all the liquid the box calls for. Because it’s so thick, you might have to add slightly more volume of buttermilk than a direct one-to-one ratio.
Or….just substituting whole milk for the water will also make a big difference. It makes it more dense and more like a homemade cake.
Devil’s food or chocolate cake mix is improved by substituting brewed coffee for the water, ounce per ounce. Just make sure it’s not too hot. Also, throwing in a handful of chocolate chips is another easy way to amp up a boxed mix.
Lemon yogurt (in lemon, butter, yellow, spice or white cakes mixes) makes a great substitute for some of the liquid called for on the box. Use 6 oz lemon yogurt, 2 T. oil and 2/3 cup water or buttermilk, then add the eggs called for on the box. Plain or vanilla yogurt will go with any cake mix flavor.
Add grated fresh carrot to carrot cake mix.
Add 1/4 teaspoon of salt and 1 to 2 teaspoons of fresh lemon juice to any of the yellow or white cake mixes. All commercial cake mixes are very sweet, especially if they are frosted, and this helps balance the flavors.
When making the basic cake (white, yellow, chocolate, etc.), sift the powder mix first. Then use applesauce instead of oil and add vanilla no matter what flavor cake you’re making.
Add 2 T. of mayonnaise to the batter and it will taste more like homemade.
Add pudding mix (ie. lemon cake mix, lemon pudding).
Add melted butter for all or part of the oil.
Add “real chocolate” shavings in chocolate cakes.
Use “Baker’s Joy” to spray baking pans, then sprinkle with a finely ground nut and sugar mix instead of flour.
To any flavor cake mix, I add 1/4 to 1/2 cup self-rising flour and 1/2 cup sugar. Sift these ingredients together into the mixing bowl. When adding the liquid ingredients, add an extra tablespoon or two of water or milk to make the batter the right consistency. It makes the cake rise more and gives it a really smooth texture.
Turn yellow cake mix into orange by using orange juice instead of water, add a tsp or two of extract for more orange flavor and put some orange zest in.
Use use coconut milk (full fat) to replace the liquids in both chocolate and vanilla cake mixes.
http://www.onegoodthingbyjillee.com
Here are a few more quick and easy doctored up recipes that caught my eye:
Pumpkin Bars. Spice cake mix, use four eggs instead of three, add a can of pumpkin and a quarter of a cup of applesauce (or oil if you prefer), omit water. Bake as directed on the box.
Apple Spice Cake. Spice Cake mix, add 3 eggs and 1 can of Comstock Apple Pie Filling. Mix and pour into 9 x 13 pan. Sprinkle with 1/4 C sugar mixed with 1/2 t cinnamon. Bake according to box directions. Serve with whipped cream.
Melted Ice Cream Cake. Take a box of white cake mix and add two cups of melted ice cream (melt it first, then measure) and 3 eggs. Mix for 3 minutes on medium speed. Pour into a greased 9 X 13 pan and bake for 35 minutes at 350 degrees. Frost however you like.
Pineapple Angel Food Cake. 1 box angel food cake mix, 1 large can crushed pineapple (undrained). Mix in large bowl and pour into greased 9 x 13 pan. Bake at 350 until springs back (45 minutes or so). Frost or serve with strawberries and whipped cream
Improved Angel Food Cake. 1 Angel Food Cake Mix, add one raw egg white, & substitute orange juice for the water.
Creme de Menthe Cake. Prepare a box of white cake mix batter according to directions. Add 3 Tbsp of green creme de menthe (the ice-cream syrup) and mix until color is uniform. Bake in a 9 x 13 pan according to directions. Cool completely. Frost with a jar of hot-fudge ice cream topping. Finally, mix 3 tablespoons of the creme de menthe syrup into a container of Cool Whip. Spread this over the hot fudge topping.
Doctored Yellow Cake Mix Cake. 1 box yellow cake mix (DO NOT use cake mix with pudding in it.), 1 can fruit cocktail packed in fruit juice (15-16 oz). Put cake mix into mixing bowl, add eggs only. DO NOT ADD WATER OR OIL. Add can of fruit cocktail with liquid. Beat with electric mixer. Pour into a greased bundt pan, bake according to package directions. No frosting needed. Very moist.
Rootbeer Cake. Follow directions on the box of butter yellow cake mix with pudding in the mix. Add 1 1/4 c. rootbeer instead of water, 1/2 c. butter softened (in place of oil) and 3 eggs. Frost with your favorite icing.
http://www.onegoodthingbyjillee.com
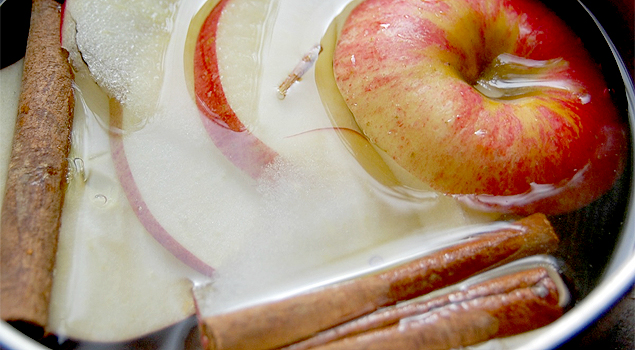
ENJOY THE AROMAS OF FALL
Ingredients:
Apple
Cinnamon sticks
Cloves
Vanilla
Water
Instructions:
Fill a small saucepan with water and bring to a boil.
Add an apple cut into quarters, a few cinnamon sticks, a handful of whole cloves, and here’s the “secret”….a teaspoon of vanilla extract. Boil the ingredients together for a few minutes, then turn the heat down to simmer. Add water as needed, usually every 30 minutes or so.
I like to use a “designated” saucepan I picked up at the thrift store for my stove top potpourri. That way I can keep it on the stove and just keep adding water and replenishing the spices as needed.
Now you know the “secret” to making your home smell like fall without turning on the oven….just be prepared to disappoint those who come into the kitchen expecting to find something delicious they can actually EAT. :-)
http://www.onegoodthingbyjillee.com
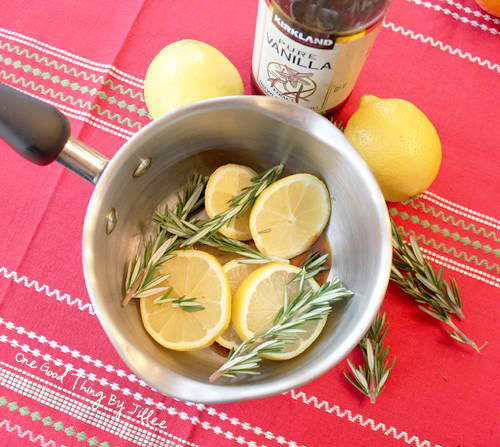
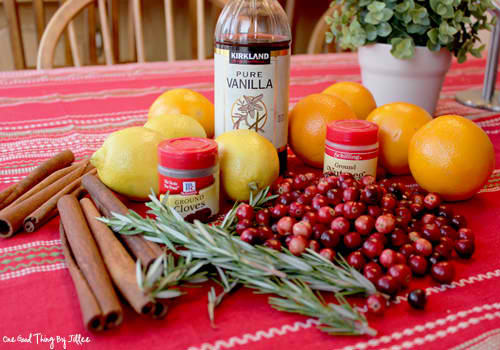
Scents of Christmas
In a small saucepan add:
1 – 2 sliced up lemons
2 – 3 sprigs of fresh rosemary
1 – 2 teaspoons vanilla
Water to about 1 inch below the rim. Place on stove and simmer on low.
http://www.onegoodthingbyjillee.com
In a small saucepan add:
1 – 2 sliced up lemons
2 – 3 sprigs of fresh rosemary
1 – 2 teaspoons vanilla
Water to about 1 inch below the rim. Place on stove and simmer on low.
http://www.onegoodthingbyjillee.com
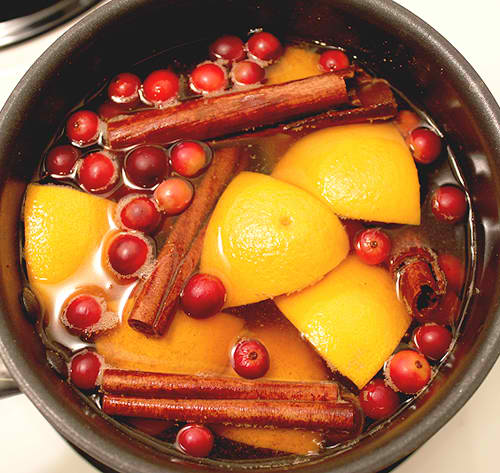
Christmas Potpourri
In a small saucepan add:
1 cut up orange (you can also slice the orange)
3 cinnamon sticks, broken in half (I think it releases more of the fragrance)
1 cup of fresh cranberries
1 – 2 teaspoons cloves (whole or ground)
1 – 2 teaspoons nutmeg
Water to fill to about 1 inch below the rim. (You could also use apple juice or cider!)
Place on stove and simmer on low. Soon your house will smell like happiness! :-)
www.onegoodthingbyjillee.com
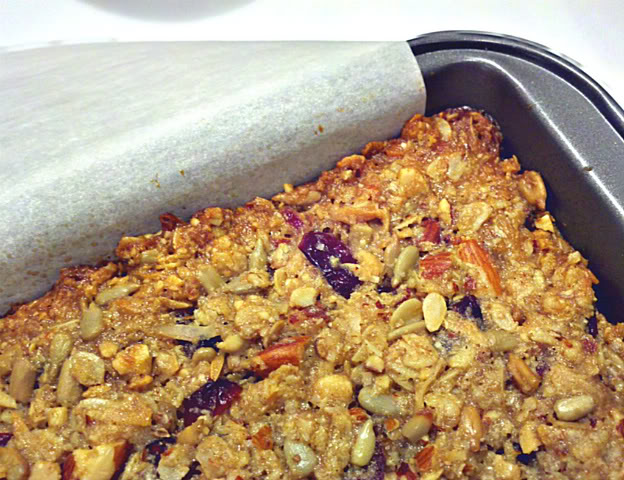
Thick, Chewy Granola Bars
1 2/3 cups quick rolled oats (if gluten-free, be sure to use GF oats)
1/2 to 3/4 cup granulated sugar (I used 3/4 cup which was ALMOST perfect. I think I’ll add just a bit more next time. I like my granola a little sweeter
1/3 cup oat flour (or 1/3 cup oats, processed in food processor or blender…I used the blender. Much easier than hauling out the food processor.)
1/2 teaspoon salt
1/4 teaspoon ground cinnamon
2 to 3 cups dried fruits and nuts (I used cranberries, coconut, sunflower seeds and almonds in an attempt to replicate my favorite store bought bars, Nature Valley Chewy Trail Mix Bars, Fruit and Nut. I also chopped up the almonds in the blender.)
1/3 cup peanut butter or another nut butter (I used Skippy creamy peanut butter)
1 teaspoon vanilla extract
6 tablespoons melted butter
1/4 cup honey, maple syrup or corn syrup (I used Log Cabin maple syrup)
2 tablespoons light corn syrup
1 tablespoon water
Preheat the oven to 350°F.
Line an 8″ x 8″ x 2″ pan (mine was more like 11″ x 7″) with parchment paper, leaving a couple of inches on each end to hang over the side of the pan. Lightly grease with non-stick spray.
Stir together all the dry ingredients, including the fruit and nuts. In a separate bowl, whisk together the vanilla, melted butter, honey/syrups and water. Toss the wet ingredients with the dry (and peanut butter, if you’re using it) until the mixture is evenly crumbly. Spread in the prepared pan, pressing in firmly!
Bake the bars for 30 to 40 minutes, until they’re just brown around the edges.
Cool the bars in their pan completely on a cooling rack. (Ooops…missed the cooling rack part!) Once COMPLETELY COOLED take out of pan, peel off parchment paper and cut into squares. If they are still a bit crumbly…put in fridge for 30 mins, then cut them. Store in airtight container.
www.onegoodthingbyjillee.com
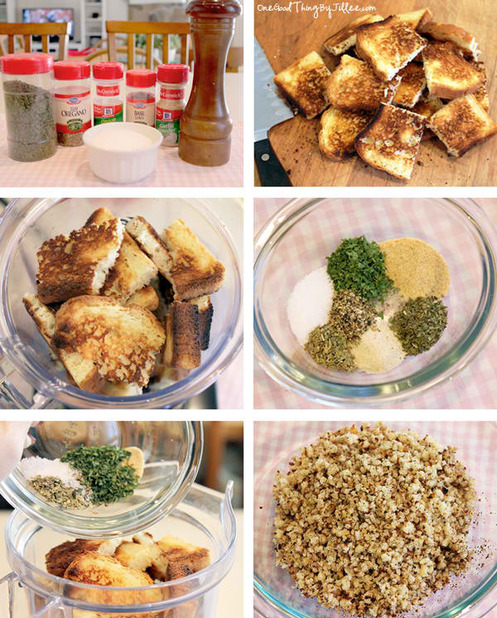
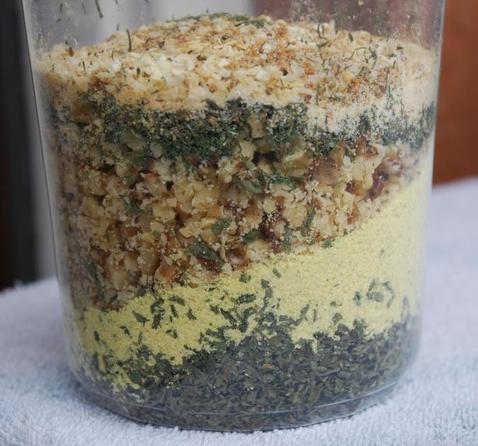
Bread Crumbs
4 slices toasted bread (I used gluten-free)
1/2 teaspoon dried parsley flakes
1/2 teaspoon garlic powder
1/2 teaspoon kosher salt
1/4 teaspoon dried basil
1/4 teaspoon dried oregano
1/4 teaspoon onion powder
1/4 teaspoon ground black pepper
Dump all the seasonings on top of the quartered toast pieces and BLEND! Done.
www.onegoodthingbyjillee.com
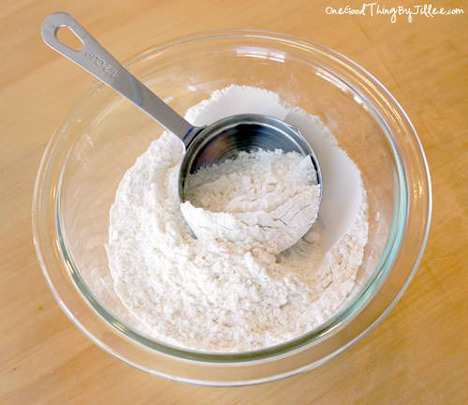
To make one cup of self-rising flour
Sift together
1 cup of all-purpose flour
1 1/2 teaspoons of baking powder
1/2 teaspoon of salt
www.onegoodthingbyjillian.com
Sift together
1 cup of all-purpose flour
1 1/2 teaspoons of baking powder
1/2 teaspoon of salt
www.onegoodthingbyjillian.com
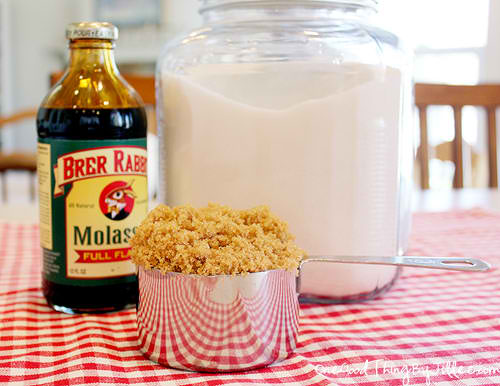
How to Make Brown Sugar
1 cup granulated sugar
1 Tablespoon molasses
Add sugar and molasses to a bowl and mix together. I used a whisk because it helped to incorporate all the molasses. It takes a few minutes until it’s completely mixed in…but that’s it. For dark brown sugar, add another tablespoon of molasses. Store in an airtight container.
http://www.onegoodthingbyjillee.com
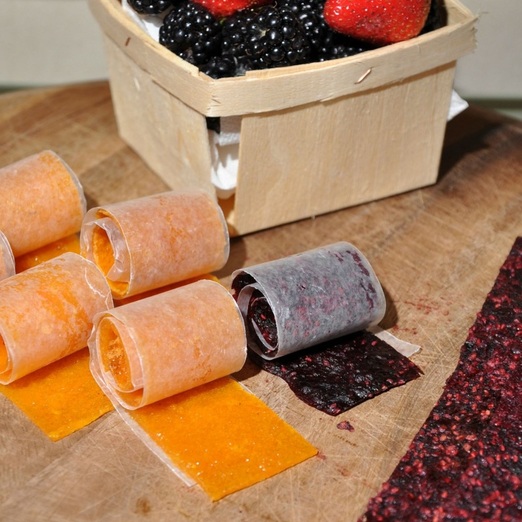
Homemade Fruit Roll-Ups
Ingredients:
2 1/2 – 3 cups ripe or slightly over-ripe diced fruit
sweetener to taste: honey, sugar, agave, etc.
2 teaspoons fresh lemon juice
optional: seasonings, spices, extracts to taste
Instructions:
Preheat oven to lowest temperature. 140° or higher.
Puree all ingredients in a food processor until smooth. Pour onto a baking sheet lined with plastic wrap, or a silicone baking mat (don’t use foil, parchment, or waxed paper), and spread to 1/8″ thick. Place in oven and bake for 6-8 hours, until center is not tacky anymore. Remove from oven and peel off of baking sheet. Cut into strips and roll in parchment or plastic. Store in airtight container or freeze.
Tips:
All fruits will produce slightly different results. Strawberries and Raspberries are two of my favorites, that consistently produce good flavor and texture. You might have to experiment to find what works well. If you’re going to make a giant batch, you may want to test one first to make sure it works well.
The addition of sugar or honey enhances the texture and makes the fruit roll ups a little more chewy than if you leave it out.
If using plastic wrap, it will shrink a little as the fruit dries, so do leave a little extra around the edges. A silicone baking mat works the absolute best in my opinion.
http://www.ourbestbites.com
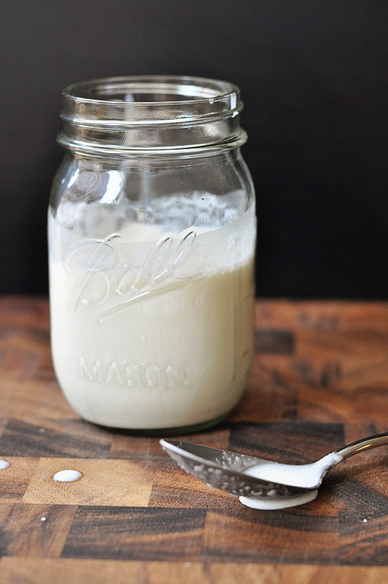
Crème Fraiche
I recommend buying a good organic cream for this. A half pint is generally cheaper than an eight-ounce container of crème fraiche and, like anything else, better ingredients equal better results.
1 half pint heavy cream
1 tablespoon buttermilk*
Pour the cream into a pint-sized mason jar or a container that has a lid. Stir in the buttermilk. Cover the top of the container loosely with a clean kitchen towel and leave at room temperature for 12-24 hours; it will become thicker the longer it stands.
Once the crème fraiche has finished culturing, place a lid on your jar or container and move it to the fridge. It will keep for a week.
TIP: You can use your homemade crème fraiche as a starter to continue making more. If you can resist eating the entire jar, combine the last couple tablespoons with a fresh cup of cream. Allow to culture at room temperature as before. Perpetuate indefinitely.
www.gfinthecity.com
IHOP pancakes
1 1/4 c. flour
1 tsp. baking powder
1 tsp. Baking soda
pinch of salt
1 egg, beaten
1 1/4 c. buttermilk
2 Tbsp. melted butter
1/4 c. sugar
Stir together the flour, baking soda, baking powder,and salt. Mix the egg with the buttermilk and add to the flour mixture, stirring only until smooth. Add the melted butter and sugar. Fry on a greased griddle. Serves 4.
http://cookinupnorth.blogspot.com
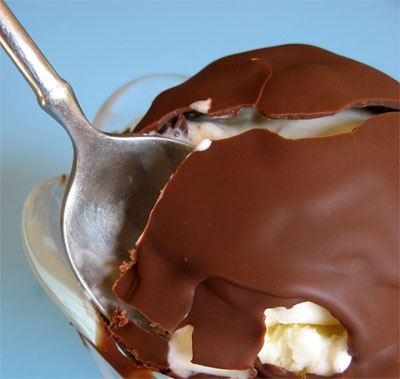
Magic Shell
All you need is:
1 1/4 Cups Chocolate Chips
1/2 Cup Coconut Oil (measured when solid)
Directions:
Melt chocolate chips and coconut oil in the microwave about 1 minute (depending on your microwave). Allow to sit a few minutes to allow the heat of the oil to melt the chocolate chips and then stir until smooth. It will be runny.
Pour into a bottle. (We recommend a glass bottle if you’re gonna refrigerate and then heat.)
Store in the refrigerator (though in the summer it’s likely to stay liquidy unrefrigerated). To serve, heat the glass bottle (open cap) in the microwave for 30 seconds until liquid. Stir and continue heating at 30 second intervals if not liquid after the first 30 seconds. Pour over your favorite ice cream and in a few seconds you will see magic!
Notes:
You can substitute butter for the coconut oil, however the coconut oil gives the more ‘real’ Magic Shell flavor.
You can use milk chocolate chips, but everyone we served preferred the semi-sweet chocolate chips
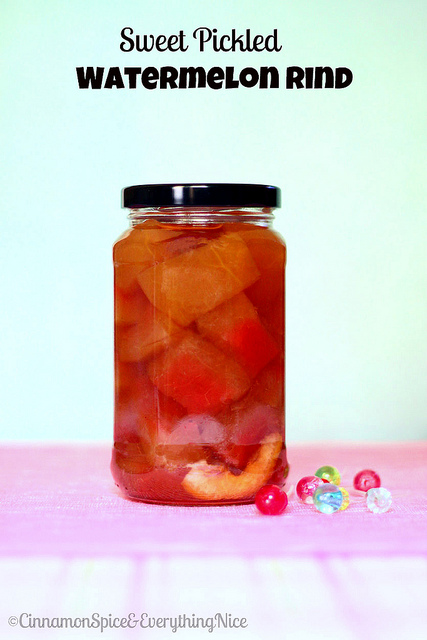
Watermelon Rind Pickles
Ingredients:
1 pound watermelon rind
Brine:
3 tablespoons salt
6 cups water
1 tray of ice cubes
Syrup:
1 + 1/3 cups honey
1/2 cup white vinegar
3 cups water
2 star anise or 5 whole cloves
2 (5-6 inch) cinnamon sticks, broke in half
1/4 of a lemon, thinly sliced with seeds removed
Instructions:
Trim most of the the pink flesh and all of the outer green skin from the rind. Cut into 1-inch pieces. To make the brine: in a large glass or stainless steel mixing bowl combine the salt and water, stirring to dissolve some of the salt. Add watermelon and ice cubes; let stand 3-4 hours or overnight.
Drain the watermelon rind in a large colander and rinse with cold water. Add to a large saucepan with enough water to cover them; bring to a simmer and cook about 10 minutes until fork tender but not mushy. Drain.
Make the syrup by combining the honey, vinegar, water, and spices. Boil 5 minutes and pour over the watermelon; add lemon slices. Let stand overnight in the refrigerator.
Heat watermelon in syrup to boiling then lower heat and simmer very slowly 25-30 minutes. Allow to cool then store in a large glass jar in the refrigerator 2-3 weeks.
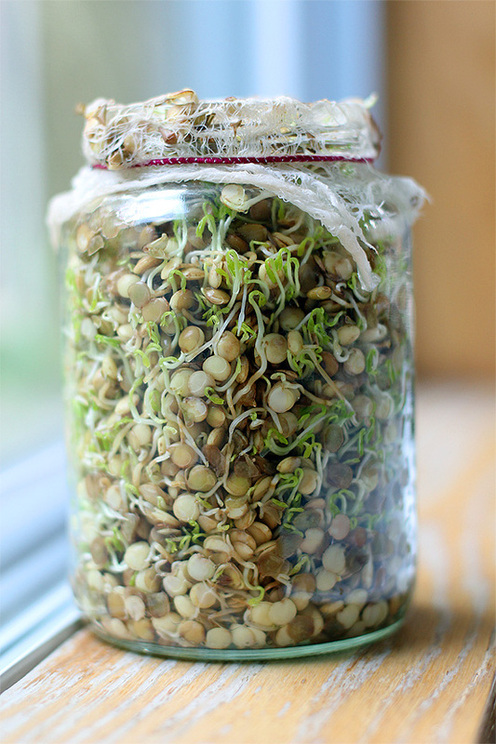
Lentil Sprouts
You can choose any variety of lentils you want – brown, green or red – but just make sure they are whole, not split or in “dahl” form. The first thing you’ll want to do measure out about a cup of lentils and inspect them for stones or damaged beans. Then rinse them really well in cool water and place them in a large bowl of water to soak overnight (8-12 hours).
The next morning your beans will be nice and plump. You can strain out the excess water, rinse and strain again and then transfer the seeds into a large jar, filling it no more than 1/3 of the way with seeds so that there’s adequate space for growth.
Now, cover the opening of the jar with some cheesecloth and hold it in place with a snug rubber band. For the next few days all you’ll have to do is rinse the seeds with fresh water by filling the jar and draining through the cheesecloth twice a day.
After each rinse, give the jar a few firm shakes and turns upside down to get all the water out of there. You want it moist in there, but you don’t want a puddle of water at the bottom where slime can build up and potentially spoil your sprouts. If you start to notice any slime, just give a few extra rinses and get it all out.
After 24 hours in the jar, you’ll start to see the beans split open and may even see some tails forming. Just keep monitoring the lentils growth and keep giving them the fresh rinses + draining for 4-5 days. Once that green leaf pokes out and starts to unfold, they’re ready to harvest.
You’ll notice that they’ll be very tightly packed in their jar(s) so you’ll have to use a little force to get them out. I like to use tongs and grab from as far down as possible.
Tricking yourself into thinking its springtime is one way of looking at it, but sprouting lentils is also a great way to add a super fresh, nutrient packed component to a meal or salad.
Lentils help cleanse and stimulate the kidneys and adrenal system, strengthen the heart and circulation and increase energy and vitality. When lentils are sprouted, their nutrients become more easily digestible, and after just 3-4 days of sprouting, their soluble fiber, which helps lower LDL cholesterol, blood pressure, and blood sugar and regulate insulin levels, increases 300 percent!
The sprouting process is super easy, and though today we’re talking about lentil sprouts, you can use this process to sprout many other seeds and beans (alfalfa, clover, mung, garbanzo, lentil, sunflower). They all have very unique and wonderful flavors, but right now it’s the peppery crunch of these little lentil guys that I can’t get enough of.
You can choose any variety of lentils you want – brown, green or red – but just make sure they are whole, not split or in “dahl” form. The first thing you’ll want to do measure out about a cup of lentils and inspect them for stones or damaged beans. Then rinse them really well in cool water and place them in a large bowl of water to soak overnight (8-12 hours).
The next morning your beans will be nice and plump. You can strain out the excess water, rinse and strain again and then transfer the seeds into a large jar, filling it no more than 1/3 of the way with seeds so that there’s adequate space for growth.
Now, cover the opening of the jar with some cheesecloth and hold it in place with a snug rubber band. For the next few days all you’ll have to do is rinse the seeds with fresh water by filling the jar and draining through the cheesecloth twice a day.
After each rinse, give the jar a few firm shakes and turns upside down to get all the water out of there. You want it moist in there, but you don’t want a puddle of water at the bottom where slime can build up and potentially spoil your sprouts. If you start to notice any slime, just give a few extra rinses and get it all out.
After 24 hours in the jar, you’ll start to see the beans split open and may even see some tails forming. Just keep monitoring the lentils growth and keep giving them the fresh rinses + draining for 4-5 days. Once that green leaf pokes out and starts to unfold, they’re ready to harvest.
You’ll notice that they’ll be very tightly packed in their jar(s) so you’ll have to use a little force to get them out. I like to use tongs and grab from as far down as possible.
Once they’re out of the jar, I like to place them in a strainer and give them one last rinse and shake. Then I line an airtight container with a couple paper towels and spread them evenly across the bottom. They’ll stay good like that in the fridge for a week or so. If you’ve sprouted way more than you can eat, just give some away in plastic baggies lined with paper towels!
There are a million ways to eat them.
Soups or salads: (lettuce, arugula, pink unripe tomatoes, avocado, cucumber, lentil sprouts)
You can choose any variety of lentils you want – brown, green or red – but just make sure they are whole, not split or in “dahl” form. The first thing you’ll want to do measure out about a cup of lentils and inspect them for stones or damaged beans. Then rinse them really well in cool water and place them in a large bowl of water to soak overnight (8-12 hours).
The next morning your beans will be nice and plump. You can strain out the excess water, rinse and strain again and then transfer the seeds into a large jar, filling it no more than 1/3 of the way with seeds so that there’s adequate space for growth.
Now, cover the opening of the jar with some cheesecloth and hold it in place with a snug rubber band. For the next few days all you’ll have to do is rinse the seeds with fresh water by filling the jar and draining through the cheesecloth twice a day.
After each rinse, give the jar a few firm shakes and turns upside down to get all the water out of there. You want it moist in there, but you don’t want a puddle of water at the bottom where slime can build up and potentially spoil your sprouts. If you start to notice any slime, just give a few extra rinses and get it all out.
After 24 hours in the jar, you’ll start to see the beans split open and may even see some tails forming. Just keep monitoring the lentils growth and keep giving them the fresh rinses + draining for 4-5 days. Once that green leaf pokes out and starts to unfold, they’re ready to harvest.
You’ll notice that they’ll be very tightly packed in their jar(s) so you’ll have to use a little force to get them out. I like to use tongs and grab from as far down as possible.
Tricking yourself into thinking its springtime is one way of looking at it, but sprouting lentils is also a great way to add a super fresh, nutrient packed component to a meal or salad.
Lentils help cleanse and stimulate the kidneys and adrenal system, strengthen the heart and circulation and increase energy and vitality. When lentils are sprouted, their nutrients become more easily digestible, and after just 3-4 days of sprouting, their soluble fiber, which helps lower LDL cholesterol, blood pressure, and blood sugar and regulate insulin levels, increases 300 percent!
The sprouting process is super easy, and though today we’re talking about lentil sprouts, you can use this process to sprout many other seeds and beans (alfalfa, clover, mung, garbanzo, lentil, sunflower). They all have very unique and wonderful flavors, but right now it’s the peppery crunch of these little lentil guys that I can’t get enough of.
You can choose any variety of lentils you want – brown, green or red – but just make sure they are whole, not split or in “dahl” form. The first thing you’ll want to do measure out about a cup of lentils and inspect them for stones or damaged beans. Then rinse them really well in cool water and place them in a large bowl of water to soak overnight (8-12 hours).
The next morning your beans will be nice and plump. You can strain out the excess water, rinse and strain again and then transfer the seeds into a large jar, filling it no more than 1/3 of the way with seeds so that there’s adequate space for growth.
Now, cover the opening of the jar with some cheesecloth and hold it in place with a snug rubber band. For the next few days all you’ll have to do is rinse the seeds with fresh water by filling the jar and draining through the cheesecloth twice a day.
After each rinse, give the jar a few firm shakes and turns upside down to get all the water out of there. You want it moist in there, but you don’t want a puddle of water at the bottom where slime can build up and potentially spoil your sprouts. If you start to notice any slime, just give a few extra rinses and get it all out.
After 24 hours in the jar, you’ll start to see the beans split open and may even see some tails forming. Just keep monitoring the lentils growth and keep giving them the fresh rinses + draining for 4-5 days. Once that green leaf pokes out and starts to unfold, they’re ready to harvest.
You’ll notice that they’ll be very tightly packed in their jar(s) so you’ll have to use a little force to get them out. I like to use tongs and grab from as far down as possible.
Once they’re out of the jar, I like to place them in a strainer and give them one last rinse and shake. Then I line an airtight container with a couple paper towels and spread them evenly across the bottom. They’ll stay good like that in the fridge for a week or so. If you’ve sprouted way more than you can eat, just give some away in plastic baggies lined with paper towels!
There are a million ways to eat them.
Soups or salads: (lettuce, arugula, pink unripe tomatoes, avocado, cucumber, lentil sprouts)
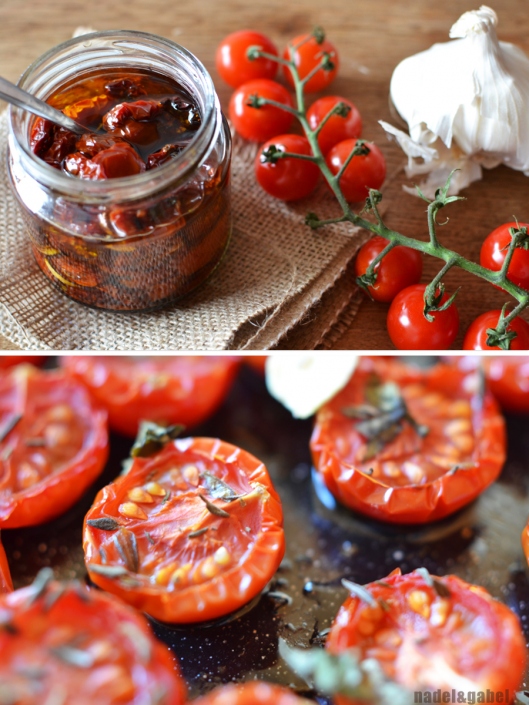
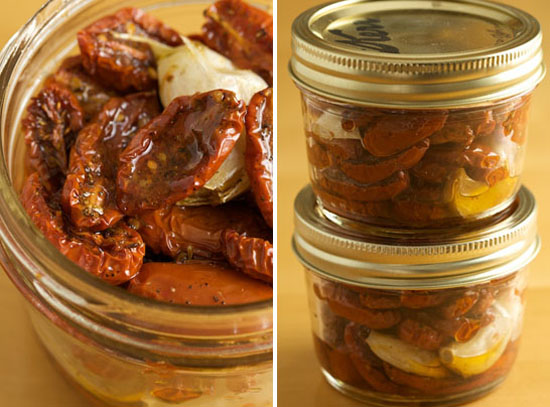
Oven Dried Cocktail Tomatoes
Ingredients:
About two handful of cocktail tomatoes, sprinkled with roughly 1 teaspoon dried thyme and a bit of freshly chopped basil (rosemary or any other herb you favour would be great as well, I’m sure). I added as well two cloves of garlic, cut into slices, and a bit of salt on top. I used about 1/2 litre olive oil.
Preparation:
Wash cocktail tomatoes, pat them dry and half them.
Cover bottom of a baking pan or baking tray with olive and lay out tomatoes cut sides up in a single layer.
Sprinkle with your chosen herbs, garlic and salt.
Preheat oven to 100°C and dry tomatoes. The time for drying can vary from 4 to 12 hours depending on the result of dryness you want to achieve. I left mine in the oven for roughly 8 hours. By then the edges of the tomatoes were shriveled and pieces had shrunken visibly. The flavour had concentrated but the tomatoes were still juicy.
After cooling down, fill tomatoes (plus herbs and garlic) into small jars and fill up with olive oil. To preserve them properly every tomato should be covered with oil.
If you use sterilized jars and if the tomatoes are always sealed from air by the oil they´re perfectly conserved. You don’t even have to store them in the fridge. But naturally they’re losing a bit of taste by and by.
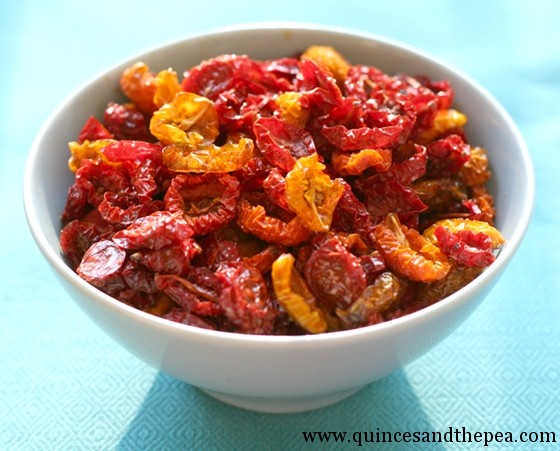
Slow-and-Low Roasted Tomatoes
Prep Time: 10 minutes
Cook Time: 6-8 hours
Ingredients:
Cherry, grape or roma tomatoes
olive oil
pinch of salt
Directions:
Preheat oven to 170 or 180.
Slice tomatoes in half lengthwise. Toss in a light amount of olive oil (no more than 1 teaspoon per cup) and a pinch of salt. Spread cut-side up on baking sheet. Bake for 6-8 hours, until tomatoes are partially dry but still have a little juice. To store, coat with a little more olive oil and keep in refrigerator.
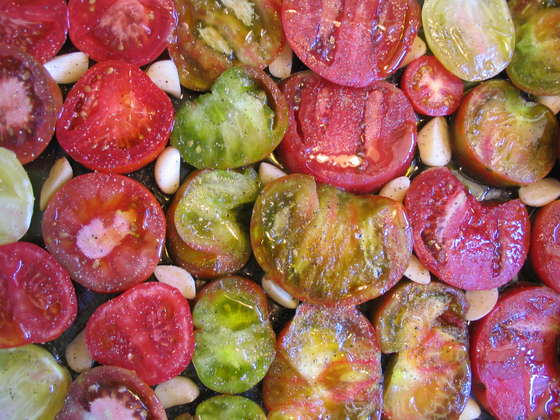
Roasted Tomatoes
Chop small tomatoes in half, and slice larger tomatoes in thirds or quarters. Lightly coat your baking dish in oil; I use spray canola for this part because I'm lazy and these heirloom tomatoes carry so much liquid they don't need more oil on the bottom.
Place your tomatoes in a single layer in the baking dish, then drizzle with extra virgin olive oil. Sprinkle with salt, pepper, and spices; here I used chopped fresh rosemary and dried oregano. Optional: stick garlic cloves in any remaining spaces to roast and do some serious flavor-trading.
Important storage notes: refrigeration kills off proper tomato flavor. Keep them on your counter, and check daily for softness or incipient mold. Don't wash them until you're ready to use them.
Once the tomatoes are placed in ziploc bags, they can be frozen.
Roasting The Tomatoes
Preheat your oven to 375 degrees.
Core and slice the tomatoes in half and lay them cut side down on a baking sheet. Here's where you can use a few tricks to infuse even more flavor in your sauce. You can peel cloves of garlic and place them in the tomatoes so the flavor is absorbed during the roasting process. You can also slice an onion and place it on the sheet with the tomatoes. All of those extra steps will help pack the tomatoes with a delicious punch of flavor.
Before sticking the pan in the oven, drizzle the tomatoes with extra virgin olive oil.
Roast the tomatoes for 40 minutes, or until you see the skin start to brown and the tomatoes look very soft. Remove them from the oven and let them cool.
Once they are cool enough to handle, drop the tomatoes into a food processor or blender and pulse until the sauce reaches your favorite consistency. Sometimes I like to go with a chunkier sauce and sometimes I decide to puree the tomatoes and get a very smooth sauce. It's all up to you and your preference as to how long you want to process the tomatoes.
USING THE TOMATOES FOR SAUCES
Pour the sauce into freezer-safe bags or storage containers. One trick I like to use is placing the sauce bags flat in the freezer so they freeze very thin. Then I can stand them up on their sides like books. This is a great space saver tip for those of you who have a small freezer or – like me – have a very packed freezer at all times.
When you want to use the sauce, all you need to do is transfer a bag or container to the refrigerator to thaw. Once the sauce has thawed, you can use it just as you would use sauce from a can.
This is a very simple sauce, so I always kick it up a notch when I'm cooking pasta. My favorite simple sauce recipe involves just a few ingredients.
Dice a medium onion and mince three gloves of garlic.
Sauté those in a little butter and extra virgin olive oil until the garlic is fragrant and the onions are translucent
Add in a cup of full-bodied red wine like Cabernet Sauvignon and simmer until it reduces by half.
Then add your sauce – about the equivalent of three standard 14-ounce cans.
Finish it off by adding two tablespoons of sugar and pepper and salt to taste.
Cover and simmer for 30 minutes and enjoy!
Slow Roasted Tomatoes
Ingredients:
Cherry, grape or pear tomatoes (or whatever tiny tomatoes you prefer)
Garlic cloves, unpeeled
Olive oil
Kosher salt
Combination of dried Italian herbs (such as fennel, oregano, basil, or thyme)*
Directions:
Line a half-sheet pan with parchment paper and heat oven to 225 degrees.
Cut enough tomatoes to fill the sheet pan (about 2 small baskets should do the trick) and place them cut-side up on the parchment paper. Scatter a handful of unpeeled garlic cloves throughout the tomatoes.
Drizzle olive oil all over the tomatoes, then sprinkle lightly with kosher salt.
Mix together some of your favorite dried Italian herbs (or just use a commercial blend) and measure out about 2 teaspoons of the mixture. Grind the herbs into a powder using a spice grinder or mortar and pestle then sprinkle evenly over the tomatoes.
Bake tomatoes at 225 degrees for 3-4 hours, or until they have shriveled but still contain a bit of moisture inside. The time will depend on the size of your tomatoes, so start checking early.
Let cool and eat immediately or store in a covered container in the refrigerator. The garlic cloves can be peeled and eaten or stored in the jar with the tomatoes for a few days, refrigerated.
Recipes Notes: I generally combine five or six different dry herbs such as basil, rosemary, thyme, oregano, marjoram, and fennel. Use as many or as few as you like.
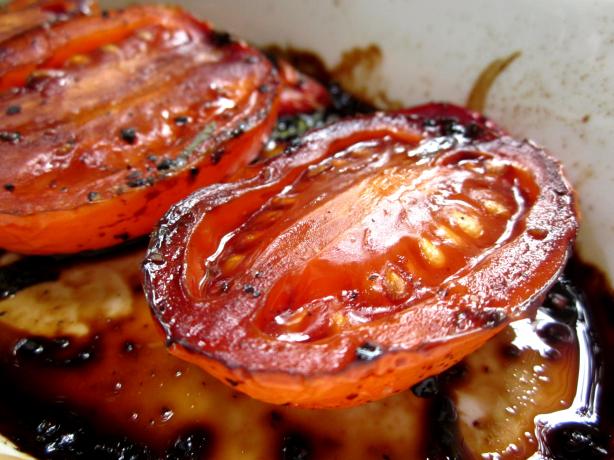
Tomatoes With Basil and Balsamic
Ingredients:
6 roma tomatoes or 6 plum tomatoes, halved
1 tablespoon balsamic vinegar
2 tablespoons fresh basil, chopped
salt to taste
black pepper, freshly cracked to taste
Directions:
Preheat the oven at 350o
Place tomatoes on oven tray with the cut side facing down.
Dash over the balsamic vinegar, basil, salt, black pepper to taste.
Bake for about 15 minutes for semi firm (still holding shape) and 30 minutes for well done (extra soft).
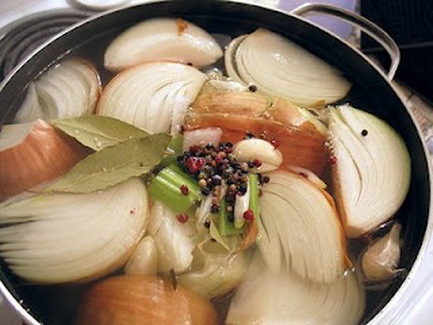
Veggie Stock - Make Your Own
Here's what I do:
Whenever I am making something with vegetables, I wash them first - then I peel, slice and dice them. Why? Because all the vegetable trimmings go in freezer bags and are placed in the freezer for later use. Carrot peels, celery leaves, mushroom stems, fennel fronds, the corn kennels scraped from corn cobs, tops of onions and the skins of ginger all find their way into my freezer bags. I love tomatoes - the skins, the seeds, the juice from drained cans, even the too wrinkled grape tomatoes left on the bottom of the carton - they all go in the bag. I only use real lemons and limes, so guess what happens to the rinds? Yep, in the bag. I do this all year around and in the summer, when I eat a lot of produce, I will fill a couple of bags in short order. Once the bags are filled, its time for the pot!
A couple of words of warning here - when you are making stock you don't want too much of one vegetable or the stock will only taste like that one veggie. The big culprit for this is celery. Celery is very strong flavored, so unless you want celery soup, you might not want more than a few handfuls of leaves per pot. The other thing to watch out for is vegetables that get bitter when cooked for too long, like broccoli.
Once I have a couple of bags of mixed trimmings, into the pot they go along with some peppercorns, sea salt, a couple bay leaves and few cloves of garlic. I fill the pot the rest of the way up with water and away we go. There is no hard and fast recipe for this, and it will taste a little different every time. That is okay! I bring the whole mass to a boil, then turn it down to simmer and cook for an hour or so. This is great to make when you are doing housework or some other kind of chore, then when you think of it as you pass by the kitchen, give the pot a stir. Taste it a bit and see if it needs more salt. Although, here again, there is one thing to keep in mind - it isn't soup. You are going to be cooking with this. Less salt is better, because you can always add more to the recipe you are using the stock in, but it is really difficult to take it out if you add in too much!
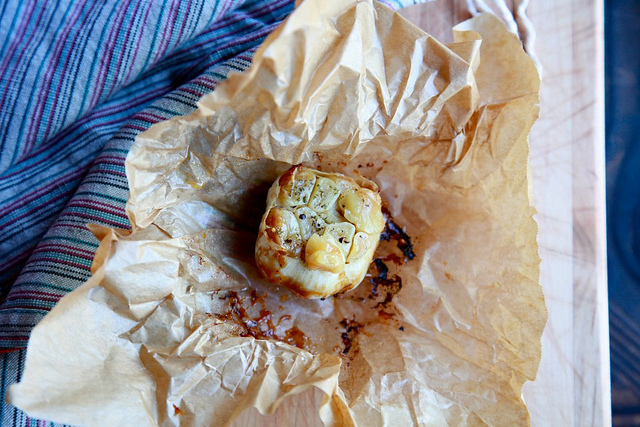
How To Roast Garlic
Makes: one head of garlic
1 head of garlic
about 2 tablespoons olive oil
about 1/2 teaspoon coarse sea salt
about 1/4 teaspoon ground black pepper
Place a rack in the center of the oven and preheat to 400 degrees F. Place a baking sheet in the oven as the oven preheats.
If your garlic head is covered in several layers of white skin, peal off a few layers. Keep several layers around to hold the head together. With a sharp knife, cut the top off the head of garlic exposing a bit of each each clove of garlic.
Place garlic head in a piece of foil or parchment paper. Drizzle olive oil on top. Top with a generous sprinkling of salt and pepper. Seal the foil around the garlic or parchment paper. If using parchment paper, use a kitchen string to seal the little package.
Place on the pan in the oven and roast for 30 to 40 minutes, or until completely tender when poked with a fork or knife.
Allow to cool slightly before spreading on toast or adding to pasta. It’s delicious.
If you have leftovers, squeeze out the pulp into a small dish, cover with olive oil, and store, tightly covered, in the refrigerator for up to 1 month.
When you are taking the time to roast garlic make a bunch – it freezes so well.
You can also add honey to roasted garlic.
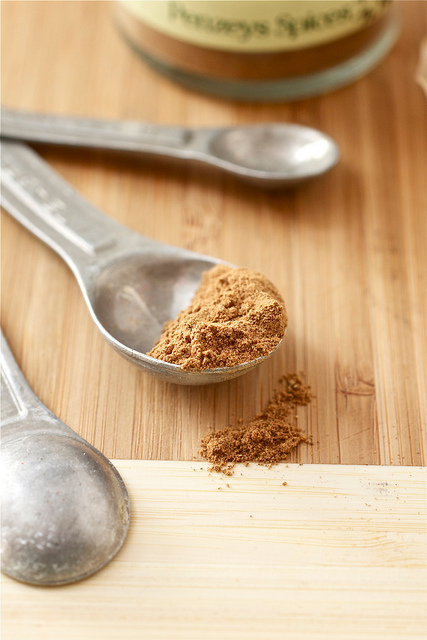
Homemade Pumpkin Pie Spice
The recipe below will yield about 1 tablespoon of pumpkin pie spice, or enough for generally all recipes that call for pumpkin pie spice. To keep a larger amount spice mix your pantry, multiply the amounts below by 4 to yield about 1/4 cup and adjust the amount of each spice to your preference; multiply by a larger number if you want/need more.
Ingredients:
1 tsp ground cinnamon
1/2 tsp ground ginger
1/8 tsp ground nutmeg
1/4 tsp ground allspice
1/4 tsp ground cloves
Instructions:
In a small bowl, stir together all the spices. Yields about 1 tablespoon.
http://smells-like-home.com
Homemade Taco Seasoning
1 part chili powder
1 part ground cumin
1 part garlic powder
1 part onion powder
1/4 – 1/2 part crushed red pepper
Mix all the spices together and store in an airtight container. I store mine in the freezer!
Use sparingly. Or liberally!
1 part chili powder
1 part ground cumin
1 part garlic powder
1 part onion powder
1/4 – 1/2 part crushed red pepper
Mix all the spices together and store in an airtight container. I store mine in the freezer!
Use sparingly. Or liberally!
Homemade Ranch Dressing Seasoning Mix
2 Tbsp dried parsley
1 tsp dried dill
1 tsp garlic powder
1 tsp onion powder
1/2 tsp dried basil
1/2 tsp pepper
Add each of the dried spices to a bowl and gently stir.
Store in a resealable plastic baggie or small ball canning jar with tight fitting lid in your spice cabinet.
To make the ranch dressing, whisk together 1/3 cup mayonaisse with 1/4 cup milk (more or less depending on the consistency you want) with 1 Tbsp of the homemade ranch dressing seasoning mix. Season with salt, to taste. Use immediately and can refrigerate for up to 3 days.
Makes about 4 Tbsp worth of mix. Or use the ratios above and mix up however much you’ll need!
14-Spice Dry Rub Mix
Servings: Makes 1-3/4 cups
Ingredients:
1/2 cup dark brown sugar
1/4 cup seasoned salt (reduce to 1/8 cup for low-sodium version)
1/4 cup paprika (sweet Hungarian)
1/4 cup smoked paprika (Spanish)
1 tablespoon garlic powder
2 teaspoons onion powder
1 tablespoon celery salt
2 tablespoons chili powder
2 tablespoons black pepper
1 tablespoon rubbed dried sage
1 teaspoon ground allspice
1 teaspoon ground cumin
1/4 teaspoon cayenne
1/4 teaspoon ground mace
1/8 teaspoon ground cloves
Directions:
Spread brown sugar out on a baking sheet for 1-2 hours so it can dry out and avoid clumping. Combine all ingredients in a food processor and pulse until well mixed. Or, sift the ingredients into a bowl and whisk them until mixed. Store in airtight container.
TO USE:
Sprinkle dry rub mix on all sides of the meat (chicken, beef, or pork) and rub it in. If you have time, wrap or cover the meat and refrigerate it for 1 hour (or as long as 12 hours) before cooking. The fridge time will enhance the flavor, but it's also good if you cook the meat right away. Grill, pan fry, or bake the meat according to your preference. Also good for seasoning meat in slow cooker.
VARIATIONS:
For a spicier blend, use hot chili powder (rather than mild) and more cayenne, cumin, black pepper.
For a sweeter blend, increase the allspice, cloves, mace, and brown sugar.
For a smokier blend, omit the sweet paprika and substitute all smoked paprika.
http://www.theyummylife.com/dry_rub_mix
Alcohol Gel Packs
2 Cups Water
1 Cup Rubbing Alcohol
Glad Freezer Zip bags
Food coloring (optional)
Pour alcohol into a ziploc freezer bag, add water & seal bag. Put a larger second bag around the first and seal it. Shake and freeze. This is very pliable and freezes well. You may also use food coloring to tint the water.
